|
|
|
 |
|
 |
| |
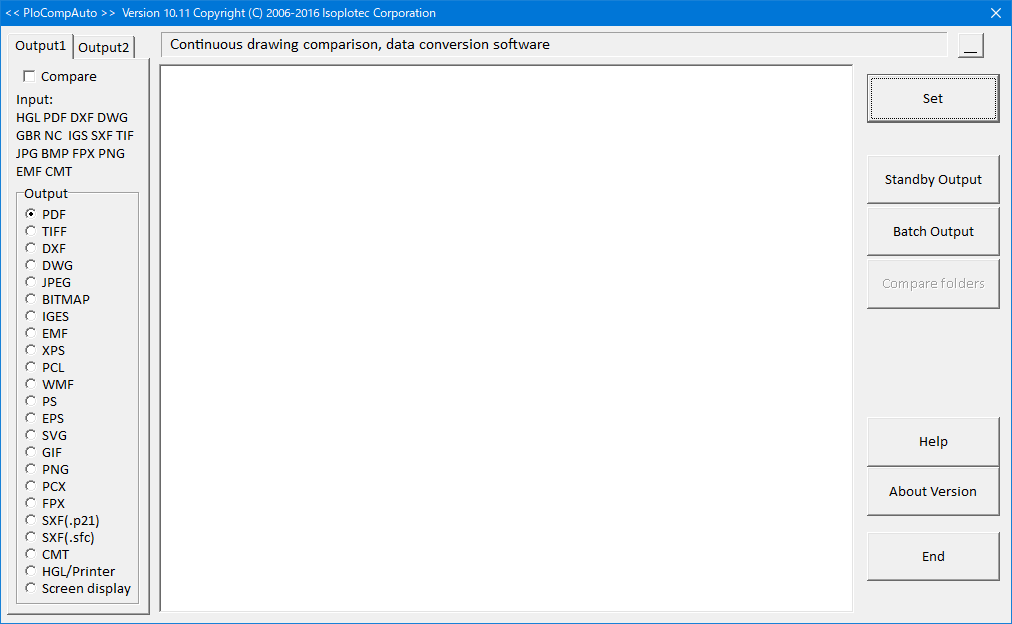
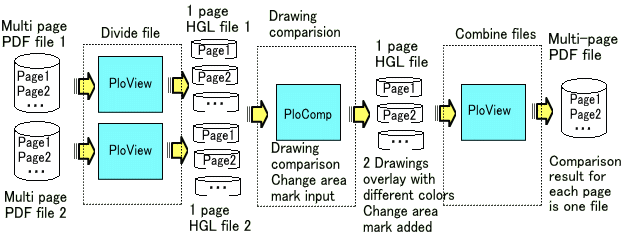
This HP describes PloCompAuto, which automatically converts a large amount
of graphic files of various formats continuously at high speed. PloCompAuto
can superimpose multiple drawings into a single drawing, color-code two
drawings and overlap them to find the difference, or find the change area.
Drawing comparison sample
 |
| |
|
|
 Index Index |
|
Outline
How to use
Automatic output special edition version PloComp
PloCompAuto start command
Output condition setup
Batch file
creation
Operation conditions
Licensing
fee
Flow to trial, order, and use
Latest upgrade history
Download
Contact us |
|
|
|
Outline
|
|
PloCompAuto is a program that automatically and continuously converts files
with the following formats. When there are a large number of drawing files,
multiple drawings can be overlapped to form a single drawing. When the
difference between two drawings is color-coded or the change area is calculated,
it is very efficient.
Reference: There is "PloCVAuto" that can
automatically compare drawings of multi-page files.
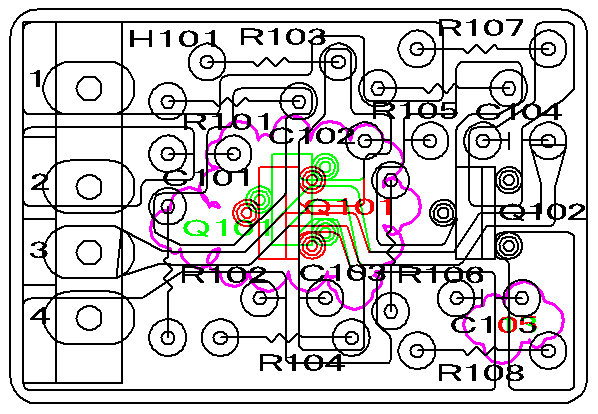
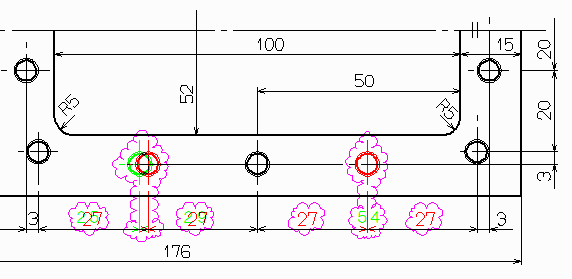
Example 1:View file A and file B of multiple colors on top of each other.
File A
File B

Example 2:Overlay file A and file B to see the changed area in different
colors.
Black and white / color file A Black and white / color file B
Read file A by red one color
Read file B by green one colo
Merge files A and B and display
Drawing comparison result:
Display cloud mark on area which exists difference in figure at
automatically
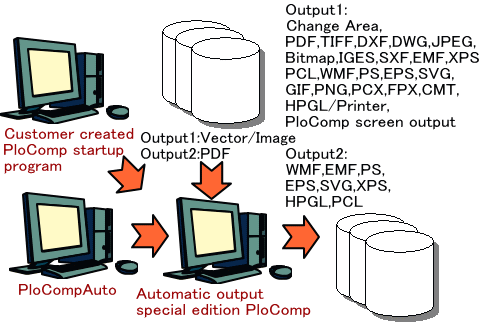
* Output 1
Input:HPGL, HP-GL/2, HP RTL, PDF, DXF, DWG, GERBER, NC-drill, IGES, SXF,
TIFF,
JPEG, Bitmap, PCX, FPX, PNG, EMF, CMT
Output:PDF, TIFF, DXF, DWG, JPEG, BITMAP, IGES, SXF, EMF, XPS, PCL, WMF,
PS,
EPS, SVG, GIF, PNG, PCX, FPX, CMT file,
HGL file / Printer, or PloComp screen
Multiple files can be read simultaneously and superimposed.
In addition, the drawing comparison of two input files is
performed,
and the change area is automatically output continuously.
* Output 2
Input:PDF
Output:WMF, EMF, PS, EPS, SVG, XPS, HPGL, PCL
PloCompAuto automatic output flow
There are the following three output modes. In addition to interactive output, output mode, wildcard output file, and batch output file can be specified by other optional parameters when starting the program, enabling automatic output from other applications.
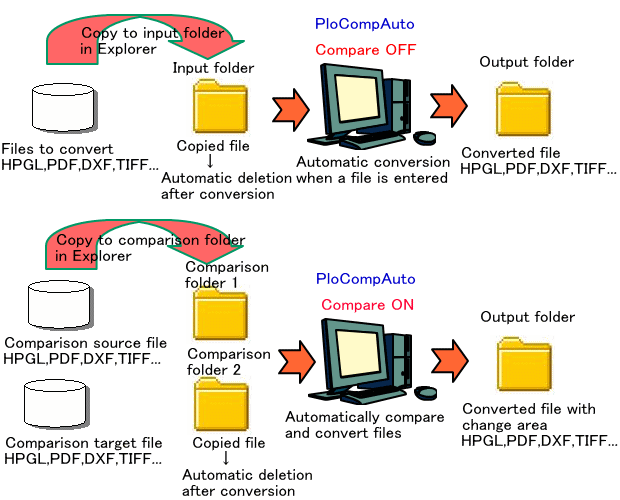
(1) Standby output mode
The specified folder is monitored, and if there is no input file, it waits until the file arrives. When the input file arrives, it is output and the input file is automatically deleted after output.
It also supports drawing comparison. When an input file is received, (3) drawing comparison between folders is started.
When drawing comparison is OFF, one input file is opened at the same time, and when drawing comparison is ON, two files are opened.
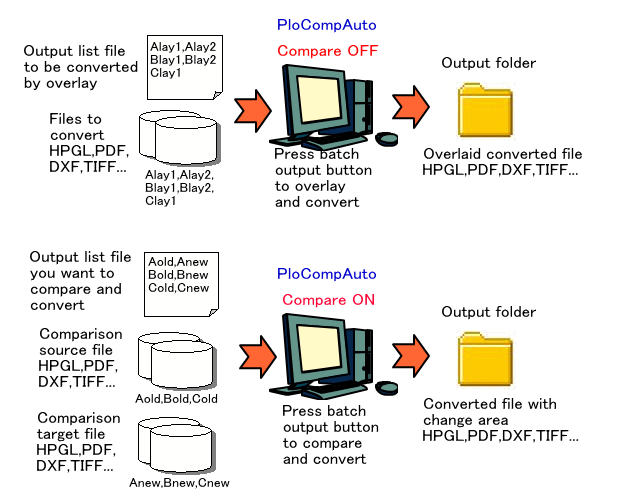
(2) Batch file output mode
Multiple input files listed in the specified output list file are output continuously. Also supports drawing comparison. You can open multiple input files at the same time.
(3) Comparison of drawings between folders
The input files with the same file names in the two specified folders are continuously compared and the changed area is output.

This program is a set with the automatic output special specification version PloComp (hereinafter referred to as PloComp).
This program generates a command line to start the automatic output special specification version PloComp and has a function to start PloComp.When starting PloComp, the next PloComp is started after the previously started PloComp ends.
To use this program, the automatic output special specification version PloComp must be installed.
To input/output DWG files, it is necessary to install DWG-DXF conversion
free software "ODA File Converter" in advance.Please refer to
PloComp's Readme.txt file for how to install this software.
PloCompAuto includes the functions of PloComp.
<Usage example>
It is in the state immediately after PloCompAuto is installed in C drive (initial setting).
Sample HP-GL data can be found in the following folder.
C:\HpglData
(1) Standby Output
Step-1
Start PloCompAuto and press the "Standby output" button.
Step-2
Use Explorer to copy the input file to the following folder:
Original: C:\HpglData\Data\DEMO1.HGL
Copy destination: C:\HpglData\InData
Then, after waiting about 2 minutes, the PDF file is automatically output in the next folder.
C:\HpglData\OutData

Each time you copy with Explorer, any file is output to a PDF file. The
copied file is automatically deleted after output.
(2) Batch File Output
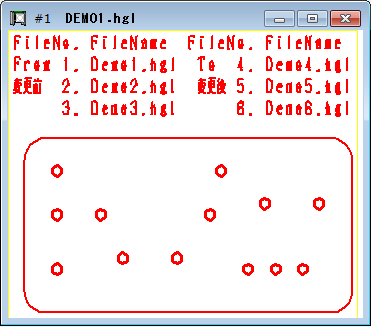
The batch file "C:\HpglData\Data\Test.txt"
It is described to open six files in the folder C:\HpglData\Data,DEMO1.hgl,DEMO2.hgl,DEMO3.hgl,DEMO4.hgl,DEMO5.hgl,DEMO6.hgl
at the same time.
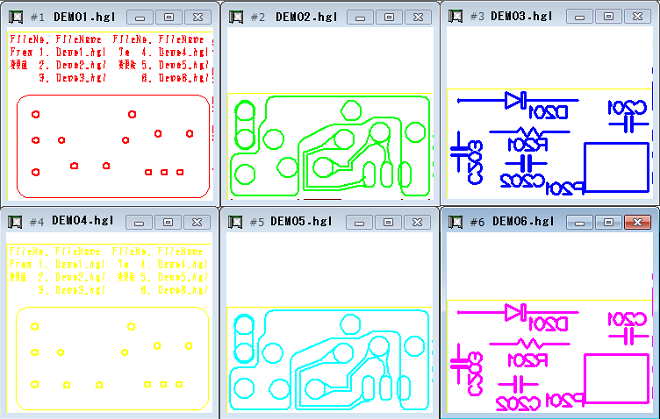
In the initial setting state of PloCompAuto, it is PDF output, and the
PDF file
C:\HpglData\OutData\DEMO1.pdf
is output.
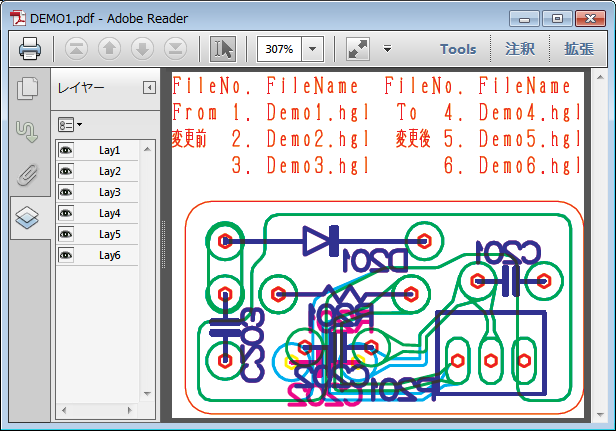
Step-1
Start PloCompAuto and press the "Batch output" button.
Step-2
Confirm that C:\HpglData\OutData\DEMO1.pdf is created in Explorer.
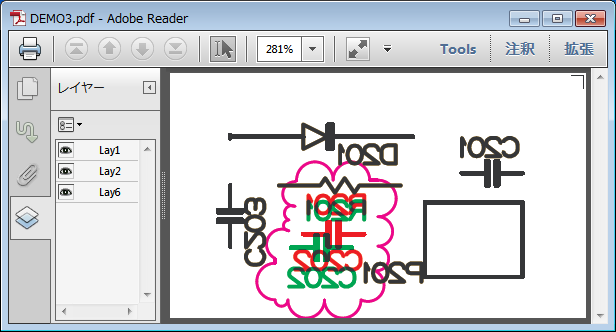
(3) Comparison of drawings between folders
In the initial setting state of PloCompAuto, the same file names between the following two folders are compared with each other to obtain a change area and output to a PDF file.
C:\HpglData\InData1\*.hgl
C:\HpglData\InData2
In addition, "C:\HpglData\InData1"and"C:\HpglData\InData2" has two files with the same file name shown below. Even if the file name
is the same, the data is slightly different between before and after the
design change.
C:\HpglData\InData1\DEMO2.HGL Before design change
C:\HpglData\InData1\DEMO3.HGL After design change
C:\HpglData\InData2\DEMO2.HGL Before design change
C:\HpglData\InData2\DEMO3.HGL After design change
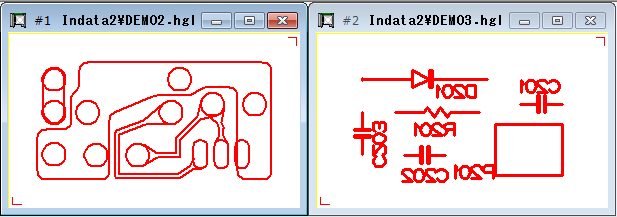
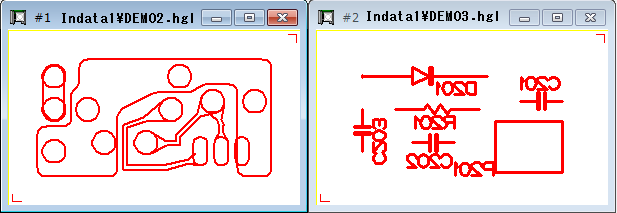
Step-1
Start PloCompAuto and check the "Compar" check box in the upper
left. Then press the "Compare folders" button.。
Step-2
Confirm that C:\HpglData\OutData\DEMO2.pdf is created in Explorer.
Start PloComp and open the following file to confirm that the change area has been created.
C:\HpglData\InData1\DEMO2.hgl
C:\HpglData\InData2\DEMO2.hgl
Also, make sure that the following PDF file is created.
C:\HpglData\OutData\DEMO2.pdf
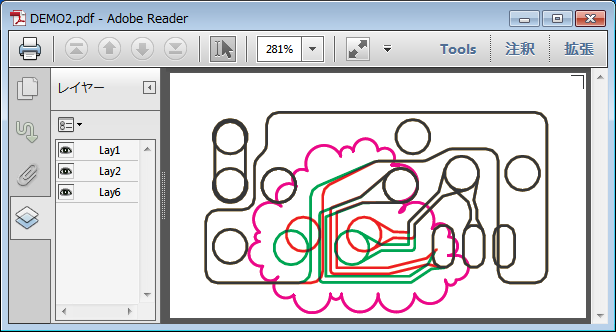
C:\HpglData\OutData\DEMO3.pdf
In order to check mixed color by AcrobatReader of Adobe, please start AcrobatReader,
select "Edit"-"Preferences" menu, select "Page
Display" of Categories, and turn ON check of "Overprint Preview".
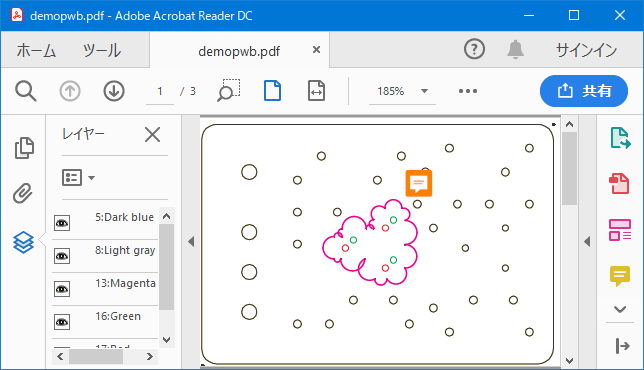
(4) Drawing comparison of multi-page PDF files
Using PloView included with PloViewAuto, and PloCompAuto the same pages
in two multi-page PDF files can be compared with each other, and a single
multi-page PDF file with a change area (cloud mark) can be obtained.
Set values other than those set here for PloView and PloComp are in the installed state.
Delete the following folders to set the settings to the installed state.
PloView: C:\Users\<username>\AppData\Local\Isoplotec\PloView
PloComp: C:\Users\<username>\AppData\Local\Isoplotec\PloComp
Note: <username> is the Windows account name
Step-1 ... PloView settings
(1) Start PloView
(2) Select "File" "Open" menu
"Edit" is set to "OFF"
"Multi Page" is set to "ON"
Open some file.
(3) Select "Output" "Printer,Plotter" menu
"Output Device" is set to "HPGL Plotter2"
Press "Plotter2 Edit" button and set "HPGL
Orijin" to "2"
"OutScale" is set to "1.0"
"Output form of page" is changed to "One
file of multi-page"
"SetEnd" button
(4) Select "Output" "PDF" menu
"OutScale" is set to "1.0"
"Paper name" is "Drawing_area + Margin"
"Layer output" to "Pen Color"
"Add PDF note annotation to the cloud mark closed
loop" to "Add sequence note"
"Output form of page" is changed to "One
file of multi-page"
"PDF color operator" is changed to "CMYK
(enable Merge)"
Output.
Step-2 ... PloComp settings
(1) Start PloComp
(2) Select "File" "Open" menu
"Edit" is set to "OFF"
Open some file.
(3) Select "Output" "Printer, Plotter" menu
"Output Device" is set to "HPGL Plotter2"
Press "Plotter2 Edit" button and set "HPGL
Origin" to "2"
"OutScale" is set to "1.0"
"SetEnd" button
Step-3
(1) After installing PloCompAuto, check the following files.
C:\HpglData\Data\demopwbs1.pdf 3 page PDF file before change
C:\HpglData\Data\demopwbs2.pdf 3 page PDF file after change
C:\HpglData\Data\CompMultiPagePDF.bat Automatic processing batch file
------------ Automatic processing batch file contents ------------------
Del /Q "C:\HpglData\InData1\*.*"
Del /Q "C:\HpglData\InData2\*.*"
Del /Q "C:\HpglData\OutData\*.*"
"C:\Program Files (x86)\Isoplotec\PloView\PloView.exe" /h "C:\HpglData\Data\demopwbs1.pdf" "C:\HpglData\InData1\demopwbs.hgl"
"C:\Program Files (x86)\Isoplotec\PloView\PloView.exe" /h "C:\HpglData\Data\demopwbs2.pdf"
"C:\HpglData\InData2\demopwbs.hgl"
"C:\Program Files (x86)\Isoplotec\PloCompAuto\PloCompAuto.exe" /h /oh "C:\HpglData\InData1\demopwbs*.hgl" "C:\HpglData\InData2\"
"C:\Program Files (x86)\Isoplotec\PloView\PloView.exe" /p "C:\HpglData\OutData\demopwbs*.hgl"
"C:\HpglData\Data\demopwbs.pdf"
------------------------------------------------------------------------
(2) Double-click the above automatic processing batch file in Explorer.
Srep-4
After the processing, the next file has been created.
Check the contents with the PDF viewer.
C:\HpglData\Data\demopwbs.pdf PDF file comparing 3 pages of drawings
Note:
The extension of the input file must be set in advance by PloComp for each
file type. Please use the free software FileTypeChg, if the extension is
not constant, for example because the extension is a sequential number.
FileTypeChg is a program that moves the extensions of all files in a folder
to the end of the file name and adds the specified extension. For details,
please refer to the following PloCon HP.
Extension batch modification of file in folder
The input and output files are PDF files here, but the same can be done
for HPGL files and TIFF files that can be multi-paged.
Return to Index |
|
| How to use |
1. Setting of PloComp
Step-1 Start PloComp and make the following settings in the "Set"
menu.
"Pen", "Text", and file extensions of
"Input file"
Step-2 Open the file.
Specify Draw Mode, ColorNo and Color for the selected file.
If the shape of the displayed file is different from what
you want, set
it again in Step-1.
Step-3 Perform all possible outputs in the "Output" menu and
check if the
desired output is produced. If it is different from what you want,
set the various output Dialog setting items or set Step-1
so that the
desired output is output.
Step-4 Exit PloComp.
2. Setting of PloCompAuto
Step-1 Start PloCompAuto.
Step-2 Press the "Set" button.
"PloComp program"
Specify the file name of the PloComp program that PloCompAuto
starts.
"Batch file name" in “Batch file output setting”
Open and output the files listed in this file when outputting a batch file.
If you press the "Reference" button, the "Open
File" dialog will be
displayed and you can specify the file.
When you press the "Input file selectin" button,
the
"Batch file creation" dialog will be displayed.
Create a batch file by selecting the drive and folder to
display the file
list, selecting the file you want to input, and moving it
to the
"File structure to open simultaneously with one output" list.
For "Output 2", be sure to specify ".pdf" as the extension of the file
name described in the batch file. Otherwise the file will
be ignored.
"Drawing comparison OFF input file" in “Standby output settings”
Prepare a folder for input files.
File names and extensions can use wildcards (represented
by the
characters *, and any character will be found to match the
position
of the *).
For "Output 2", if you specify an extension other
than ".pdf", the extension
is automatically changed to ".pdf".
Search for a file that matches this output file name in standby output
mode and automatically output it.
"Standby time for output"
This is the interval to check whether the drawing data to
be output has
been generated in the folder.
0 minutes is internally set to 2 seconds.
"Drawing comparison setting between folders"
Prepare a folder containing the comparison source input file
and a folder
containing the comparison destination input file.
"Comparison file 1"
Please specify the file name to be compared.
File names and extensions can use wildcards
(represented by the
character "*", and the position of the "*" will be searched as a
match for any character).
"Comparison folder 2 (Ex. C:\HpglData\InData2\)"
Please specify the name of the folder containing
the file to be
compared.
"Output folder"
Prepare a folder for the output file.
Specify the name of the folder that contains the output file.
"Inpu file extension" button
Associate the file extension with the input file type.
3. Output with PloCompAuto
Step-1 Confirm that PloComp is stopped and start PloCompAuto.
Does not output when PloComp is running.
Step-2 Switch the output file type in the Main Dialog.
"Output 1":
"Compare"
If this check box is turned on, the drawings
will be compared and
the changed areas will be output.
In this case, CMT cannot be specified for the
output file type.
Type of input file
HPGL,PDF,DXF,DWG,GERBER,NC-drill,IGES,SXF,
TIFF,JPEG,Bitmap,PCX,FPX,PNG,GIF,EMF,CMT
Type of output file
PDF,TIFF,DXF,DWG,JPEG,BITMAP,IGES,SXF,EMF,XPS,PCL,WMF,PS,EPS,SVG,
GIF, PNG, PCX, FPX, CMT, HGL/Printer, screen
display
"Output 2":
The input file is a PDF file only.
Type of output file
WMF, EMF, PS, EPS, SVG, XPS, HPGL, PCL
Step-3 Output
(1) Standby output
Searches for a file that matches the "input file name" in the "Standby output setting" set with the "Set" button, outputs it if it exists, and automatically deletes the output input file after output is complete. Search for the next matching file and repeat the process. If the file does not exist, wait for the waiting time. Then go back to the beginning and repeat the same steps.
input file
* When the "Compare" check is OFF
The input file name is "Drawing comparison OFF input file"
in
"Standby output settings" by pressing the
"Set" button.
Example C:\HpglData\InData1\*.hgl
One input file can be opened at the same time.
Perform data conversion.
* When "Compare" check is ON
The input file name is the file in "Comparison file 1" and
"Comparison folder 2" of "Drawing comparision
setting between folders"
by pressing the "Set" button.
You can specify a wildcard "*" for "Comparison
file 1".
Example Comparison file 1 C:\HpglData\InData1\*.hgl
Comparison folder 2 C:\HpglData\InData2\
When files are entered in Comparison file 1, "Drawing comparision
between folders" is performed.
Continuously compare the input files with the same file name in
the two folders and output the changed
area.
The input file will disappear after the standby output, so please copy the input file to the input folder. Copy work can be done with Explorer, or with other dedicated applications for copying.
(2) Batch file output
Multiple input files described in "Batch file name" of "Batch file output setting" set with the "Set" button can be output continuously in the order listed.
(3) Drawing comparison between folders
The input files with the same file name in the two specified folders are continuously compared and the changed areas are output.
Search for a file name (wildcard "*" can be specified) that matches
"Comparison file 1" set with the "Set" button, then
search for the same file name in "Comparison folder 2" and compare.
The search order is alphabetical by file name. However, you can use the
"Set" button to skip comparison based on the attributes of the
comparison file's update date and file size.
4. When outputting by changing the setting contents of PloComp
Basically, after the operation of item 1 above, the output of item 3 is performed.
By copying the PloComp setting file to another location, preparing multiple settings for each condition, and restoring the setting file before starting PloComp and PloCompAuto, the setting contents can be switched.
Step-1 Set PloComp in Step-1 of item 1.
PloComp setting contents are saved in the following setting file.
C:\Users\<username>\AppData\Local\Isoplotec\PloComp\PloComp0.par
However, <username> is your Windows login ID
Step-2 Copy the above PloComp setting file with Explorer.
example:
Copy source: C:\Users\<username>\AppData\Local\Isoplotec\PloComp\PloComp0.par
Copy destination: C:\Temp\PloComp0A.par
However, the copy destination folder name and file name are
arbitrary
Step-3 Create a batch file like the one below.
example:
Batch file name C:\Temp\PloCompAutoA.bat
Contents of the batch file
Copy /Y C:\Temp\PloCompOA.par C:\Users\<username>\AppData\Local\Isoplotec\PloComp\PloComp0.par
"C:\Program Files (x86)\Isoplotec\PloCompAuto\PloCompAuto.exe"
Step-4 Double-click the batch file in Explorer to execute it
Note:
The extension of the input file must be set in advance by PloView for each
file type. When extension cannot specify because of consecutive numbers
etc., please use free software FileTypeChg. FileTypeChg is program which
moves extension of all file in folder to file name end, and applies the
specified extension. Please refer to the following PloCon HP for details.
Extension batch modification of file in folder
Return to Index
|
|
|
Automatic output special edition version PloComp
|
|
The command line for starting PloComp is added to the normal version of PloComp. After starting the program, PloComp is iconified and executed. When the
execution is completed, the program ends. See the PloComp page for the regular version of PloComp. Customers can directly start
PloComp by creating an application without using PloCompAuto.
1. PloComp settings
Output condition is beforehand memorized by the following method.
Please start PloComp without parameter, open a suitable HPGL file, output by setting up an output condition, and end PloComp.
The output condition is memorized in the setting file.
However, drawing area always becomes the whole drawing.
Setting file:
C:\Users\<username>\AppData\Local\Isoplotec\PloComp\PloComp0.par
You can switch the setting contents by preparing multiple setting files and returning the setting file before issuing the PloComp startup command.
The location of the setting file, the file is described in the "PloComp
folder, UnInstallment".
2. PloComp startup command line
Command line of program starting is as follows. [ ] Inside character is omissible. PloComp iconifies and executes after program starting.
Compressed file cannot be specified as drawing file.
(1) Command line that reads two drawing files to be compared and obtains
change area
PloComp.exe /c "Drawing file name1" "Drawing file name2"
Drawing file 1 is read to file No.1, drawing file 2 is read to file No.2, and change area is searched. Other conditions become details specified by change area search.
(2) Command line to read multiple drawing files and convert them to specified
format file
PloComp.exe /p "Drawing file name" ["Drawing file name"] [/o"Output file name"]
Plural drawing files are read from file No.1, and PDF file is outputted to [Output file name]. Other output condition becomes details specified with PDF output.
In addition, instead of /p
Output will be PDF file if /p is specified.
Output will be DXF file if /d is specified.
Output will be DWG file if /u is specified.
Output will be TIFF file if /t is specified.
Output will be JPEG file if /j is specified.
Output will be Bitmap file if /b is specified.
Output will be GIF file if /g is specified.
Output will be PING file if /m is specified.
Output will be PCX file if /r is specified.
Output will be FPX file if /q is specified.
Output will be IGES file if /i is specified.
Output will be EMF file if /e is specified.
Output will be XPS file if /x is specified.
Output will be PCL file if /l is specified.
Output will be WMF file if /w is specified.
Output will be PS file if /s is specified.
Output will be EPS file if /k is specified.
Output will be SVG file if /v is specified.
Output will be SXF file if /y is specified.
In addition, file type of SXF file is as follows by output-file-name
designation existence.
Output-file-name extension File type
Omission
File type set up in SXF output dialog
.p21
P21
.sfc SFC
Output will be HPGL file or Printer if /h is specified.
(3) Command line for converting view files to comment files
PloComp.exe /a [/l"Layer-No."] "ViewFileName" ["ViewFileName"] [/o"OutPutFileName"]
Plural view files are read and comment file is outputted to [output file].
The first view file is the layer number of "Layer-No.". The next
view file will be the number of the empty layer that is incremented by
one from the layer number of "Layer-No.". If "Layer-No."
is not specified, it will be layer1. If you do not specify an output file
name:
<Setting file folder>\Temp\<The first view file name_extension>.cmt
Example:
Command line:
PloComp.exe /a "C:\Data\abc.hgl"
Output file:
C:\Users\<username>\AppData\Local\Isoplotec\PloComp\Temp\abc_hgl.cmt
(4) Command line that reads two drawing files to be compared, finds a change
area, and converts it into a specified format file
PloComp.exe /cp[n] "DrawingFileName1" "DrawingFileName2" ["DrawingFileName"] [/o"OutputFileName"]
Drawing file 1 is read to file No.1, drawing file 2 is read to file No.2, and change area is searched. Other conditions become details specified by change area search. Then, plural drawing files which follow are read, and PDF file is outputted to [OutputFileName]. Other output condition becomes details specified with PDF output.
It does not output, when letter of n is put in after /cp and the requested number of change areas is zero.
In addition, instead of /cp
Output will be PDF file if /cp is specified.
Output will be DXF file if /cd is specified.
Output will be DWG file if /cu is specified.
Output will be TIFF file if /ct is specified.
Output will be JPEG file if /cj is specified.
Output will be Bitmap file if /cb is specified.
Output will be GIF file if /cg is specified.
Output will be PING file if /cm is specified.
Output will be PCX file if /cr is specified.
Output will be FPX file if /cq is specified.
Output will be IGES file if /ci is specified.
Output will be EMF file if /ce is specified.
Output will be XPS file if /cx is specified.
Output will be PCL file if /cl is specified.
Output will be WMF file if /cw is specified.
Output will be PS file if /cs is specified.
Output will be EPS file if /ck is specified.
Output will be SVG file if /cv is specified.
Output will be SXF file if /cy is specified.
In addition, file type of SXF file is as follows by output-file-name
designation existence.
Output-file-name extension File type
Omission
File type set up in SXF output dialog
.p21
P21
.sfc
SFC
Output will be HPGL file or Printer if /ch is specified.
(5) Command line for converting PDF files to wmf, emf, ps, eps, svg, xps,
hgl, pcl
PloComp.exe /f "PdfFileName" /o"OutputFileName"
PDF file (indispensable) is read and it converts into output file (indispensable).
Extension of PdfFileName must be ".pdf".
Extension and file type of OutputFileName must be the next contents.
wmf: Windows Metafile
emf: Microsoft Enhanced Metafile
ps : Postscript
eps: Adobe Encapsulated PostScript
svg: Scalable Vector Graphics
xps: Microsoft XPS Document Writer
hgl: HP-GL plotter language
pcl: HP Page Control Language, Printer Command Language Format
When output kinds are PS, EPS, XPS, HGL, and PCL, output scale set up by Convert PDF file is applied.
(6) Batch file output command line
By describing the command parameters of (1)..(5) above in a batch file, you can efficiently convert multiple files at once.
With (1)..(5) method, PloComp is started and terminated for each file conversion process, and it takes several seconds to start and end PloComp. Consequently, if you convert a large amount of files at once, it will take more time than this method.
In this method, for example, when converting 10 HPGL files of medium capacity (260 KB) into PDF files, the processing speed is about 5 times faster than the method of (1)..(5).
PloComp.exe /z "batch file name"
The batch file is a text file and the format is as follows.
Command parameters excluding "PloComp.exe in (1)..(5)
Command parameters excluding "PloComp.exe in (1)..(5)
...
Batch file example: File name = "C:\Batch\aaa.txt"
/p "C:\Data\abc.hgl" /o"C:\Out\abc.pdf"
/t "C:\Data\abc.hgl" /o"C:\Out\abc.tif"
/f "C:\Data\def.pdf" /o"C:\out\def.hgl"
Example of using batch file output command line
"C:\Program Files (x86)\Isoplotec\PloComp\PloComp.exe" /z "C:\Batch\aaa.txt"
3. Multiple PloComp can not be started at the same time
When you make plural files output continuously, please check that previous PloComp finishes and start the next PloComp. It is impossible to start two or more PloComp simultaneously. PloComp which required starting afterwards is ended without doing anything.
4. Processing error
When error occurs midway through automatic output, error message is written in file shown below. Since error is added to error file and the amount of data increases to times of error generating, please delete file suitably.
<PloCompData>\Error.txt
<PloCompData> is as follows.
C:\Users\<username>\AppData\Local\Isoplotec\PloComp
Error message format is as follows.
"Time of error generating" "Input drawing file name which carried out error generating" "The details of error"
Example:
2006/03/19 16:19:52 C:\HPGLData\DEMO.hgl HPGL Data Error Count= 237
When you compare the drawings, PloComp will write the result to the next log file.
<PloCompData>\Compar1.log
<PloCompData>\Compar2.log
Log file "Compar2.log" format
*1..3 Reason for not comparing; File name of comparison file 1
Number of change areas; Processing time (year/month/hour/minute/second);
File name of comparison file 1
Note: Lines beginning with * are output when the "Do not compare"
condition of the Dialog is set in PloCompAuto folder comparison.
Example:
* 1 File size and update time are the same; C:\HpglData\InData1\demo4.hgl
* 2 Size of file1 or file2 is zero; C:\HpglData\InData1\demo5.hgl
* 3 File size differs by more than 30%; C:\HpglData\InData1\demo6.hgl
5; 2019/07/02 10:10:14; C:\HpglData\InData1\demo1.hgl
52; 2019/07/02 10:11:05; C:\HpglData\InData1\demo2.hgl
21; 2019/07/02 10:15:26; C:\HpglData\InData1\demo3.hgl
The log file "Compar1.log" contains only one line of the latest
result.
PloCompAuto empties the "Compar2.log" file before starting processing.
Return to Index |
|
|
|
PloCompAuto start command |
|
There are many ways to start PloCompAuto as shown below.
Specify the parameters in the order described here.
The meaning described as "If the parameter is omitted, the parameter used last time will be used" means the contents set by starting PloCompAuto interactively last time or the parameter started by specifying the previous parameter is used.
(1) Interactive mode
PloCompAuto.exe
PloCompAuto starts in interactive mode when started without parameters.
(2) Start in standby output mode
PloCompAuto.exe /a[c] [/oT] ["Input file name" ["Output folder name"]]
When /a is added, the drawing comparison is turned off at the same time as starting, and the standby output mode is set. When an input file arrives, it is output. Only one input file can be opened at a time. When the process is complete, the input file is deleted.
When /ac is added, the drawing comparison is turned on at the same time as starting,
and the standby output mode is set. When an input file arrives, the inter-folder
drawing comparison process is executed. When the process is complete, the
input file is deleted.
When /oT is added, you can specify the output type. If this is not specified, the
output type used last time will be used. However, "T" is the following one character.
"p" for PDF output
"t" for TIFF output
"d" for DXF output
"u" for DWG output
"j" for JPEG output
"b" for BITMAP output
"i" for IGES output
"e" for EMF output
"x" for XPS output
"l" for PCL output
"w" for WMF output
"s" for PS output
"k" for EPS output
"v" for SVG output
"g" for GIF output
"m" for PNG output
"r" for PCX output
"q" for FPX output
"y" for SXF output
"a" for CMT output
"h" for HPGL / Printer output
"0" in the screen display
If you specify the [input file name], this becomes the input file. If not specified, the previous input file
is used.
Looking for the same drawing file as the [input file name], and output if any, after output, the drawing file is automatically deleted.
If there is no drawing file, wait until the file arrives.
When drawing comparison is ON, the input file described here is [comparison file 1], and [comparison folder 2] is the content set by pressing the "Set" button.
You can use the wildcard "*" in the input file name.
Example:"C:\HpglData\InData1\*.hgl"
When the [Output folder name] is assigned, the same name as the output file name in this folder and
the extension matches the output type, PDF, TIF, DXF, DWG, JPG, BMP, GIF,
PNG, PCX, FPX, IGS , SXF, EMF, XPS, PCL, WMF, PS, EPS, SVG, GIF, PNG, PCX,
FPX, HGL files are output. If no [Output folder name] is given, the output folder name used previously will be used.
Example:"C:\HpglData\OutData\"
Or
PloCompAuto.exe /b[c] [/oT] ["Input file name" ["Output
folder name"]]
If /b is added, the program enters the taskbar and operates in the same way as /a except that no dialog is displayed.
(3) Start in batch file output mode 1
PloCompAuto.exe /c [/oT] ["Batch output file name1" ["Output
folder name"]]
When /c is added, batch file output mode 1 is set at the same time as startup.
In batch file output mode 1, the list of input files to be output is referenced from the batch output file, and the setting conditions other than the start parameters here are the same as those used previously.
When /oT is added, you can specify the output type.If this is not specified, the
output type used last time will be used. However, "T" is the following 1-2 characters.
"p" for PDF output
"t" for TIFF output
"d" for DXF output
"u" for DWG output
"j" for JPEG output
"b" for BITMAP output
"i" for IGES output
"e" for EMF output
"x" for XPS output
"l" for PCL output
"w" for WMF output
"s" for PS output
"k" for EPS output
"v" for SVG output
"g" for GIF output
"m" for PNG output
"r" for PCX output
"q" for FPX output
"y" for SXF output
"a" for CMT output
"h" for HPGL / Printer output
"0" in the screen display
After drawing comparison, "cp" for PDF output
After drawing comparison, "ct" for TIFF output
After drawing comparison, "cd" for DXF output
After drawing comparison, "cu" for DWG output
After drawing comparison, "cj" for JPEG output
After drawing comparison, "cb" for BITMAP output
After drawing comparison, "ci" for IGES output
After drawing comparison, "ce" for EMF output
After drawing comparison, "cx" for XPS output
After drawing comparison, "cl" for PCL output
After drawing comparison, "cw" for WMF output
After drawing comparison, "cs" for PS output
After drawing comparison, "ck" for EPS output
After drawing comparison, "cv" for SVG output
After drawing comparison, "cg" for GIF output
After drawing comparison, "cm" for PNG output
After drawing comparison, "cr" for PCX output
After drawing comparison, "cq" for FPX output
After drawing comparison, "cy" for SXF output
After drawing comparison, "ca" for CMT output
After drawing comparison, "ch" for HPGL/Printer output
After drawing comparison, "c0" without output
If the option of batch output file name1 is added, this becomes a batch output file, otherwise the batch output file used last time will be used. Multiple input files listed in [Batch output file name1] are read and output continuously.
In addition, if you attach [Output folder name] in various file output, in this folder, the same name as the output file
name and extension matches the output type, PDF, TIF, DXF, DWG, JPG, BMP,
IGS, EMF, XPS, PCL, WMF, PS, EPS, SVG, GIF, PNG, PCX, FPX, HGL files are
output. If no [Output folder name] is given, the output folder name used previously will be used.
Screen display means starting PloComp and displaying the input file described in the batch file in a superimposed manner.When you exit PloComp, PloComp starts again and displays the input file written next to the batch file.Repeat until there are no more batch file descriptions. This function is used, for example, to check a lot of results after comparing drawings on the screen.
Or
PloCompAuto.exe /d [/oT] ["Batch output file name1" ["Output folder name"]]
If /d is added, the program enters the taskbar and operates in the same way as /c except that no dialog is displayed.After processing, PloCompAuto ends.
(4) Start in drawing comparison mode between folders
PloCompAuto.exe /g [/oT] ["Comparison file name1" "Comparison
folder name2"] [Output folder name]
When /g is added, it will be in inter-folder drawing comparison mode at the same
time as starting.
When /oT is added, you can specify the output type. If this is not specified, the
output type used last time will be used. However, "T" is the following one character.
"p" for PDF output
"t" for TIFF output
"d" for DXF output
"u" for DWG output
"j" for JPEG output
"b" for BITMAP output
"i" for IGES output
"e" for EMF output
"x" for XPS output
"l" for PCL output
"w" for WMF output
"s" for PS output
"k" for EPS output
"v" for SVG output
"g" for GIF output
"m" for PNG output
"r" for PCX output
"q" for FPX output
"y" for SXF output
"a" for CMT output
"0" without output
If the option of [Comparison file name1] and [Comparison folder name2] is added, this becomes a comparison file, otherwise the comparison file used last time will be used.
For [Comparison file name1], you can specify the wildcard "*".
Search for the file name that matches the [Comparison file name1], search
for the same file name in the [Comparison folder name2], and compare. If
[Comparison folder name2] is not specified, [Comparison file name1] is
ignored and [Comparison file name1] and [Comparison folder name2] used
before are used. The output destination will be [Output folder name], and if omitted, it will be the setting contents of PloComp.
example:
Comparison file name 1 "C:\HpglData\InData1\*.hgl"
Comparison folder name 2 "C:\HpglData\InData2\"
Or
PloCompAuto.exe /h [/oT] ["Comparison file name1" "Comparison folder name2"]
If /h is added, the program enters the taskbar and operates in the same way
as /g except that no dialog is displayed. After processing, PloCompAuto ends.
Return to Index |
|
|
|
Output
condition setup |
|
(1) Settings in the PloCompAuto main dialog
There are "Output 1" and "Output 2" tabs in the upper left of the main screen when PloCompAuto is started. By switching between these tabs, you can change the type of input and output files.
"Output1":
"Compare"checkbox:
If this check box is selected, drawing comparison is performed and the changed area is output.
In this case, CMT cannot be specified as the output file type.
Input:
HPGL, PDF, DXF, DWG, GERBER, NC-drill, IGES, SXF, TIFF, JPEG, BMP, PCX,
FPX, PNG, GIF, EMF, CMT
"Output"Radio button:
Specify whether to output PDF, TIFF, DXF, DWG, JPEG, BITMAP,
IGES, SXF, EMF, XPS, PCL, WMF, PS, EPS, SVG, GIF, PNG, PCX, FPX, CMT, HGL/Printer
If the "Compare" check box is turned on, output will be performed after drawing comparison processing.
The bottom of the "Output" radio button changes as follows according to the state of the "Compare" check box.
"Compare"check on ・・・ 'No output'
"Compare"check off ・・・ 'Display'
If "No output" is selected with the "Compare" check box checked, this means that only drawing comparison is performed and no output is performed thereafter.
When "Display" is selected with the "Compare" check off, when "Standby Output" or "Batch Output" button is pressed, PloComp starts and the drawing file is displayed on the PloComp screen.By using this function, it is possible to check the results continuously on the PloComp screen after performing many drawing comparison processes.
"Output2":
The input file is only a PDF file.
Output file types are WMF, EMF, PS, EPS, SVG, XPS, HPGL, PCL, and can be selected with a radio button.
"Set"button:
Click this button to the setting dialog is displayed. Refer to the next section (2) for the setting method.
(2) Settings in the setting dialog
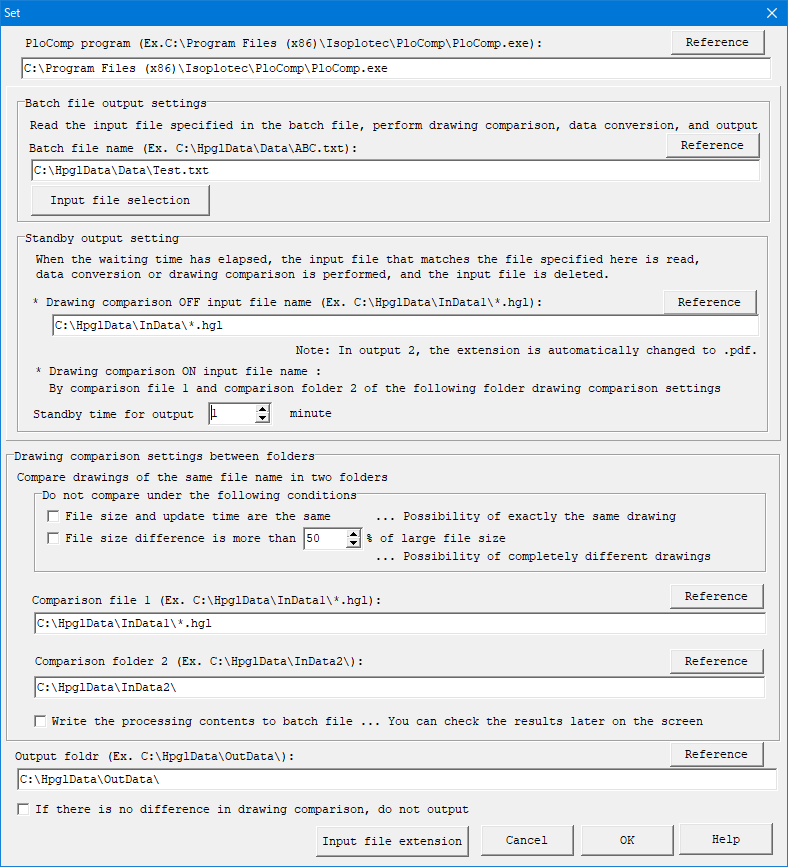
"PloComp program (Ex. C:\Program Files (x86)\Isoplotec\PloComp\PloComp.exe)":
Specifies the program name of the automatic output special specification version PloComp that PloCompAuto starts.
Specify the full path (folder name + file name + extension).
---------------------------------------------------------
<Batch file output settings>
By clicking the "Batch Output" button, you can read the drawing file specified in the batch file and make settings for drawing comparison or various file output.
"Batch file name(Ex. C:\HpglData\Data\ABC.txt)":
When the batch file is output, the data of the file name described in this file is output. Click the "Reference" button to specify the file name. Specify the full path (folder name + file name + extension).
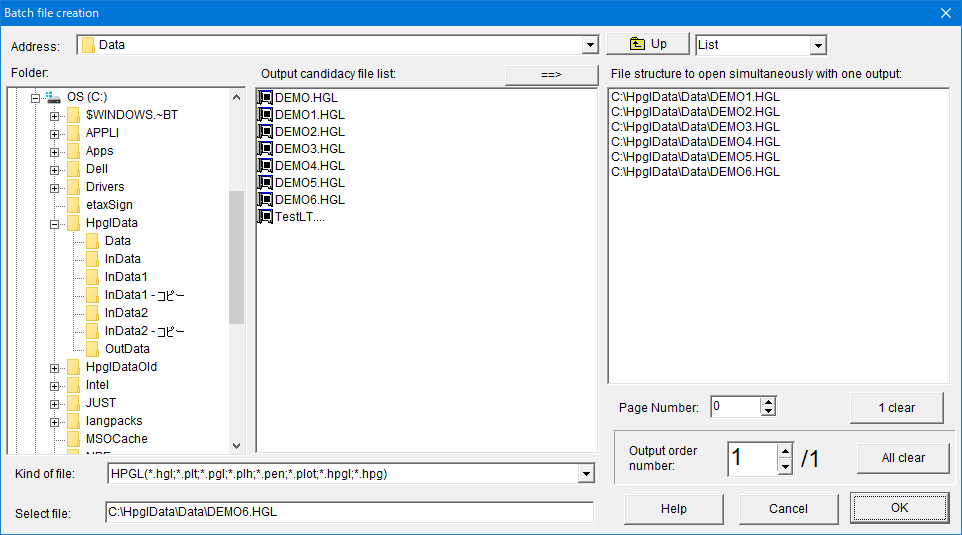
"Input file selection"button:
Click this button to display the Batch file creation dialog box.
---------------------------------------------------------
<Standby output setting>
When the waiting time has passed, if there is an input file that matches the file specified here, it will be read and converted, or the drawing will be compared and output, and the input file will be deleted.
“Drawing comparision OFF input file name (Ex. C:\HpglData\InData1\*.hgl)":
Specify the full path (folder name + file name + extension). File names and extensions can use wildcards (represented by the "*" character, and the "*" position is searched for any string).
In "Output 2", if an extension other than ".pdf" is specified, the extension
is automatically changed to ".pdf".
Ex.:C:\HpglData\InData\*.hgl
In this case, the folder name is "C:\HpglData\InData\", the file name is all, and the file with the extension ".hgl"
is searched.
“Drawing comparision ON input file name:"
It depends on the "comparison file 1" and "comparison folder
2" in the following <drawing comparison setting between folders>.
"Standby time for output":
This is the processing interval (the interval to go to see if the output drawing data has been generated in the folder). 0 minutes is 2 seconds internally.
---------------------------------------------------------
<drawing comparison settings between folders>
Compare the drawings of the same file names in the two folders, and make settings for outputting the changed area. Find the file name that matches the "Comparison file 1", and search for the same file name in the "Comparison folder 2" and compare them.
"Do not compare under the following conditions":
You can remove the comparison file from the file attributes before comparing.
This allows for faster comparison.
Select the conditions that will not be compared from the following.
If not selected, drawing comparison is performed.
* File size and update time are the same
... Possibility of exactly the same drawing
* File size difference is more than [ ]% of large file size
... Possibility of completely different drawings
Enter a number between 1 and 99 in [ ].
If not compared,in the log file "Compar2.log" output by drawing comparison,it is stated that the comparison was not made.
Log file format
*1~3 Reason for not comparing; File name of comparison file 1
Number of change areas; Processing time (year month hour minute second); File name of comparison file 1
Example
*1 File size and update time are the same ; C:\HpglData\InData1\demo4.hgl
*2 Size of file1 or file2 is zero ; C:\HpglData\InData1\demo5.hgl
*3 File size differs by more than 30% ; C:\HpglData\InData1\demo6.hgl
5; 2019/07/02 10:10:14; C:\HpglData\InData1\demo1.hgl
52; 2019/07/02 10:11:05; C:\HpglData\InData1\demo2.hgl
21; 2019/07/02 10:15:26; C:\HpglData\InData1\demo3.hgl
"Comparison file 1 (Ex. C:\HpglData\InData1\*.hgl)":
Specify the file name that is the basis of the comparison. Specify the full path (folder name + file name + extension). File names and extensions can use wildcards (represented by the "*" character, and the "*" position is searched for any character that matches).
"Comparison folder 2 (Ex. C:\HpglData\InData2\)":
Specify the name of the folder that contains the file to be compared.
"Write the processing contents to batch file":
If checked, the processed file list will be written to the batch file. After the drawing comparison process, you can use this batch file to automatically start PloComp and check the changes on the screen. The method is described below.
After clicking the "Compare folders" button to compare the drawings, uncheck the "Compare" check box in the main dialog and set the output type to "Display". Click the "Batch Output" button.PloComp starts, the first drawing is loaded, and you can see the changes. Exit PloComp, the next PloComp starts and the next drawing is loaded. You can repeatedly view the drawings processed by drawing comparison between folders.
Note: If "Standby Output" is selected with the "Compare" check box ON, this function cannot be used because the input file is automatically deleted.
---------------------------------------------------------
"Output foldr (Ex. C:\HpglData\OutData\)":
Specify the name of the folder that contains the output file.The output file name is the name of the input file with an extension that matches the output type.
"If there is no difference in drawing comparison, do not output":
If this check box is selected, PDF will not be output (even if output is specified) when the number of change areas is zero as a result of drawing comparison.
"Input file extension":
Click this button to display the "Input file extension setting" dialog box.
Associate the file extension with the file type.
Return to Index |
|
|
|
Batch file
creation |
|
If you press the "Input file selectione" button in the above
setting dialog, you can select and set multiple input files to be output
in the order of output.
Return to Index |
|
|
|
Operation conditions
|
|
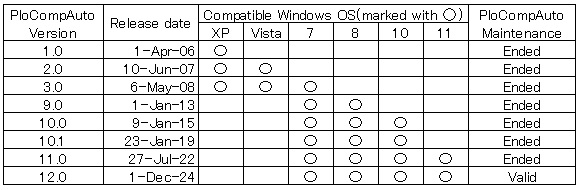
1. PloCompAuto Ver.12.0 Operating conditions
Personal computer of Intel compatible CPU mounting
- Empty capacity of memory: 2GB or more
- Empty capacity of hard disk drive: 2GB or more
- Screen resolution: 1024
dots x 768 dots Above
- OS: Windows 7, 8, 10 and 11 (32bit and 64bit)
- It is necessary to
install some printer drivers.
Printer driver of high resolution is required to read PDF file.
- It is necessary to install free software "ODA File Converter" at input
and output of DWG file.
2. Supported OS and maintenance for each PloCompAuto version
Return to Index |
|
|
|
Licensing fee
|
|
This software is shareware.
When used 30 days or more from installation, please remit the next licensing
fee.
Licensing fee is
950.00 US$ / license
Automatic output special edition version PloComp Ver.12.0 is attached.
Return to Index |
|
|
|
Flow to
trial, order, and use |
|
1. Trial
Please download product from this HP. Since product is compressed into
ZIP file, please extract it with suitable thawing software. There is a
file called Readme.txt in the decompressed file, so read the product overview,
installation method, uninstallation method, license agreement, licensing
fee, license cancellation, protection release, inquiries, and version upgrade
history. In the extracted files, you will find a file called SetupPloCompAutoE.exe
for PloCompAuto and a file called SetupPloCompE.exe for PloComp, so you
can install them by double-clicking them in Explorer. Please do the work
so far to product of both PloCompAuto and PloComp. Opening to the public
on HP serves both as trial and object for formal. All the function usage
can be carried out free for 30 days from installation for trial. If 30
day will pass and password will not be entered, protection starts and product
stops working. Please order the formal version, when you use more.
2. Order of formal
version
It can pay with PayPal or credit card with the next
button.
 |
Please refer to Readme.txt file to carry out bank transfer.
Please send the next "Order sheet" to e-mail address described
at the last of this HP.
Order sheet
1. Soft name: PloCompAuto(English)
2. Soft version no.: 12.0
3. Order quantity: 1
4.
Company name:
5. Offer person name:
6. Offer person E-mail ID:
7.
Charge payment day:
8. Charge payment amount:
9. Attached software: Automatic output special edition version PloComp
Ver.12.0
3.Sending of
password
The copyright holder will email the password when payment of the
licensing fee has been confirmed.
4.Release of lock
* PloCompAuto
It is not locked.
* PloComp
In order to enter password, when starting PloComp.exe, it is necessary to carry out mouse right-click, to take out pop up menu, and to select "Run as administrator". Execute PloComp and display 'Version Information' dialog box with the menu 'Help'-'Version Information' and input the password.
5.OS exchange, or exchange of installation personal
computer
Even if you replace exchange of OS, or installation personal
computer, given password can release lock.
However, at the same time the
number of units that can install the product on the PC is within the number you
ordered.
6.Revision up (upgrading the decimal point of version
number to 2nd place)
Revision up is free. Please download the revision
software newer than HP and reinstall it. The previous password is
valid.
7.Maintenance of PloCompAuto
Return to Index |
|
|
|
Latest upgrade history
|
|
Ver.10.11 October 1, 2019
(1) new release.
Ver.10.11 October 19, 2019
(2) When putting the Windows GodMode icon on the desktop, an error occurred
at startup. This was repaired.
Ver.10.11 August 18, 2021
(3) Fixed the problem that hangs when multiple files are selected in "CreateOutList" Dialog on Windows 10 Pro PC.
Ver.11.00 July 27, 2022
(1) Compatible with Windows 11.
(2) Code signing
was added.
By attaching a code sign, the software distribution source is
authenticated, and it is guaranteed that spoofing and content tampering have not
been performed. Recently, Windows and security check software have tightened
security checks, and there are increasing cases of false recognition even though
there is no virus. Code signing may reduce false positives.
Ver.11.01 March 16, 2023
(1) The output folder can be specified when comparing folder drawings with
the PloCompAuto start command.
PloCompAuto.exe /g [/oT] [Comparison file 1] [[Comparison folder 2] [Output folder]]]
PloCompAuto.exe /h [/oT] [Comparison file 1] [[Comparison folder 2] [Output folder]]]
(2) Do not start multiple PloCompAuto at the same time.
Ver.11.01 September 15, 2023
(3) Updated the deadline for code signing.
Ver.11.01 November 13, 2023
(4) When there are no files in either "Compare Folder 1" or "Compare
Folder 2", an error message will appear when you press
the standby output button with "Compare" ON.
This problem has been fixed.
Ver.12.00 December 1, 2024
(1) Upgrade the included software to PloComp Ver.12.0.
Ver.12.00 April 3, 2025
(2) The installation file name has been changed from setup.exe to SetupPloCompAutoE.exe.
* Upgrade history of automatic output special edition PloComp
Ver.11.00 July 27, 2022
(1) Compatible with Windows 11.
(2) Code signing
was added.
By attaching a code sign, the software distribution source is
authenticated, and it is guaranteed that spoofing and content tampering have not
been performed. Recently, Windows and security check software have tightened
security checks, and there are increasing cases of false recognition even though
there is no virus. Code signing may reduce false positives.
Ver.11.00 February 10, 2023
(3) Added the following text to Article 2 of
"License agreement".
"This software cannot be operated remotely."
Ver.12.00 December 1, 2024
Please refer to the PloComp website.
Return to Index |
|
|
|
Download |
|
Automatic output special edition PloComp Ver.12.0 Software
download
PloCompAuto Ver.12.0 Software download
Note :
1.To install, unzip the downloaded file, follow the instructions in the Readme.txt file,
and run SetupPloCompAutoE.exe for PloCompAuto and
SetupPloCompE.exe for PloComp.
2.Our product has been virus
checked.
What to do if you see the message "The app you're to install isn't
a Microsoft-verified app" during installation
When "Windows protected your PC" is displayed
at the time of installation,
if there is only "Don't run" or "OK" button, please
click "More info" and
press "Run anyway" button.
When "Do you want to allow this app to make changes to your device?" is
displayed
at the time of installation, press "Yes" button.
3.This HP is
always put up only the latest version.
Acquisition of an old version
becomes impossible.
Please copy the downloaded file to a data medium
for re-installation.
PloCompAuto Ver.12.0 Catalog(PDF) download
Return to Index |
|
|
|
Contact us
|
|

Return to Index |
| |
|
| |
Other websites posted on PloCompAuto |
| |
* SourceForge
* Slashdot
* PCWin
Software Downloads Center
Return to Index |
| |
|
|
 Ver.12.0